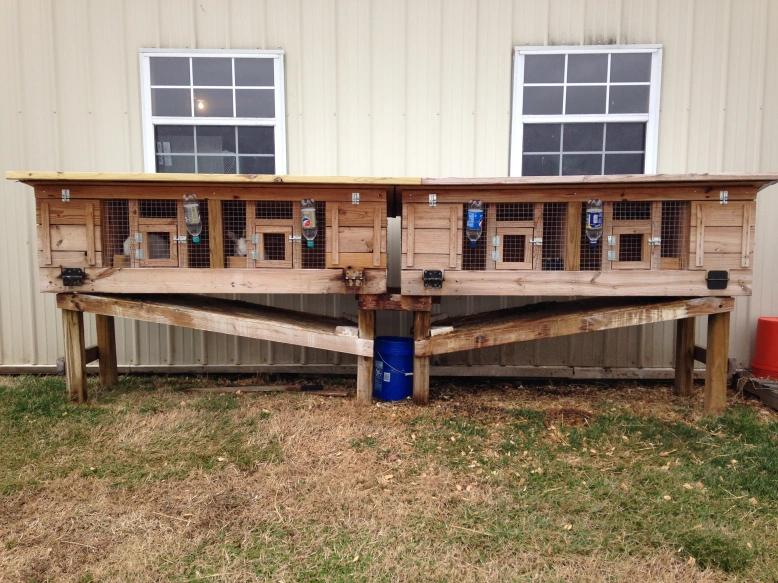

So many of you have asked for plans to our RABBIT HUTCH w/ AUTOMATIC POOP COLLECTOR. Finally, we have had the time to answer your requests. With some minor repairs needed and a timely “vacancy,” we decided to take the left half of our hutches apart and REPAIR, UPGRADE, and DOCUMENT a HOW-TO with lots of pictures and step by step directions. Hopefully, this will answer any questions you might have, but if not please don’t hesitate to ask and we can walk you through the process. This project is 2 identical hutches placed side-by-side with a common roof. The hutches house a total of 4 rabbits (2 per hutch).

First, we started with building the base or sub-floor out of 2×4’s. As you can see in the pictures we have written the dimensions of each piece in order to make the building process much easier and understandable. The rabbit “DEN” was given cross members in the sub-floor that only measured 3″ tall. This was to allow the 1/2″ plywood floor to sit flush. Over time the rabbits urine and poop in the den will rot away the floor so we included these easily removable floors to make our life a little bit easier down the road. After the sub-floor framing was done, it was time to cut out the 1/2″ x 1/2″ wire mesh that came in a roll 24″ wide. Originally, we built the hutch with 1″ x 1″ wire mesh because it was all we had at the time. However, this 1″ x 1″ mesh can be hard on the rabbits feet. It also has large enough openings for a baby to squeeze through. Using a simple construction stapler and a pair of wire cutters, the wire mesh floors were complete.
Next, we flipped the sub-floor upside down to install the legs. We cut the 4×4 wooden legs to 36″ in length. The legs were screwed in place with 3″ screws. With 2 members of the family being under 5′ tall it was important to keep the hutch at a height that was manageable for everyone in the family. (It’s important to know that the taller the hutch, the easier the poop will roll into your bucket.) Once the legs were firmly secure we flipped the hutch back on its feet to begin construction of the “SKELETON” or walls.
***THE BASIC SKELETON IS WHAT MAKES UP THE RABBIT HUTCH. YOU CAN ACHIEVE ANY LOOK YOU WANT BY HOW YOUR DECIDE TO COVER THE SKELETON. THIS WAY YOU CAN MAKE YOUR RABBIT HUTCH TRULY YOUR OWN AND A ONE OF A KIND***
The SKELETON is made up of 2×4’s that we cut apart to make 8′ 2×2’s. Each wall was nailed together with a framing nailer, however each wall was “SCREWED” to the sub-floor and each adjoining wall for easy removal or repair if needed. Once again, check the photos carefully as each 2×2 piece has its length written on it. We started with constructing and installing the back wall first and then built and installed the side and interior walls. Finally, we finished with the front walls and roof supports. This completes the structural interior skeleton of the hutch.
Next it was time to add some plywood walls to separate the den from the eating area and a center wall was added to create the 2 different living areas.
The plywood roof was added next, and covered with tar paper which was stapled down. We gave the hutches a tin roof. However, you can only see it on the final product because the 2 hutches share the same roof. The roof can only be installed once the hutches are in their final location to insure the roof is straight and square. To avoid any cuts from the roof edge a 2×4 was notched out and laid over the edge of the roof, thus covering any sharp edges.
After the roof was installed as much as it could be, we started the siding. We used 1″ decking material to give the hutches a “CABIN” look and feel. Being new to Missouri when we originally built the hutches, we had no idea how “truly cold” it got here so we wanted thick walls to keep the cold out, warmth in, and also to protect the rabbits from predators. Because the weather “normally” approaches from the SW, we placed the hutches on the EAST SIDE of our shop in order to protect them from the wind and rain. Also, we wanted the rabbits to get the direct morning sun during the winter and shade after noon during the HOT, HOT, SUMMER.
Finally it was time to build the doors for each den and install them. We used the same 1″ decking wood and connected them with 2 strips of wood on the inside of the door that opens downward by use of a typical interior door hinge you would find in your home. These were re-used from our house as we switched them out with nickel hinges. Two thin decorative strips ( the by-product of ripping a 2×4 apart to make 2 qty 2″x2″s) of wood were nailed into place using a finishing nailer and is purely decorative.
Now that the hutch is finished, it will be moved into its final resting place. There are several ways to install the hutch. We buried the legs of ours into the ground to keep them from blowing over in the wind or a predator pulling it over. Another way, would be to put “SKIS” on the bottom of the 4×4 legs. This will give the hutch a wider base and a lower center of gravity. This newly remodeled hutch will get some SKIS. We will then move our 2 rabbits into the new hutch while we remodel the right side. At that point, they will both be installed into a permanent location.
AND FINALLY FOR THE BEST PART….. THE POOP SHOOT!!!
Only when the hutch, or hutches are in there final resting place would I install the AUTOMATIC POOP COLLECTOR. You want to be able to make sure that the poop ramps are both at the same angle should you choose to make 2 hutches. And there are just too many variables to take into consideration when installing it. This is why is just best to wait and install it last. The last thing that you want to do is to take apart your hutch to because something doesn’t fit. By waiting you save yourself time and effort.

The poop ramps were originally made from plywood which we painted with a rubber based paint. However, after a year the paint began to break down and prohibited the poop from rolling completely into the bucket. Once the paint broke down, then the plywood began to rot. Ideally, I would like to use a sheet of aluminum to avoid rust and corrosion. Sheet metal would work, but I would recommend painting it well, as rabbit urine has a very high acidic value to it. One option we have for the ramps is to staple “SCREEN DOOR” mesh to the 2×4 ramp frame. This will allow the poop to roll into the bucket while allowing the acidic urine to fall straight through. Of course plastic sheets or acrylic sheets will also work great with our humidity. Whatever we decide to use, I’m sure we will make it work.

We hope this helps you in your quest to build your own rabbit hutch. Don’t forget to ask us if you have any questions about this project or any other. We are here to help anyway we can. Thanks again and HAPPY HOMESTEADING.


Do you know about how much the materials cost, difficulty, and average time spent building it? Thank you! Love this idea~!
LikeLiked by 1 person
If you know your way around a woodshop, this can be done in a day. Realistically, a weekend. The cost is really dependent on YOU. We have shown the basic skeleton or framework of the design (floor, legs and framing of walls). This part is relatively inexpensive (under $40). Where is can get expensive is in your cost of materials for siding, what type of roof and roofing materials, stain, hinges, latches, ramp material, etc. This is one thing we love about the design is that you can customize the outside look to suit your taste and needs. You can make it as expensive or cheap as you want. We used pressure treated 1″ deck boards for the siding, plywood roof, with tar paper and tin sheets and stained it with a linseed oil/ paint thinner 50/50 mix. By buying all the materials, not reclaiming anything, and building it just like ours…. we estimate the cost to be around $400 total for both hutches (housing 4 bunnies). However, you can bring that total down dramatically by using reclaimed materials. Hope this helps, any more questions, don’t hesitate to ask and we will get back to you as soon as possible. Remember when building your hutches, take into consideration the location of the hutches, inside/ outside, in a barn, weather extremes, and your climate. What is good for us may not be needed for you. We were very careful when picking the location, giving them protection from the wind and rain, while giving shade in the afternoon and the morning sun to warm them on cold days.
LikeLiked by 1 person
I’m trying to estimate how many feet total in lumber. Do you by chance have an estimation? I love this design, it would make my rabbit a lot cleaner. 🙂
LikeLike
For 1 hutch (holds 2 rabbits) it would take approximately 2 qty. of 4×4″ posts 8′ long for the legs. The framework, or skeleton, plus poop ramp would be around 8 qty. 2×4″ at 8′ long each. By ripping the 2×4’s and making them into 2×2″‘s for the framework will save you a lot of $$$. When it comes to the siding, that’s up to you. We splurged and used 1″ thick pressure treated deck boards for insulation and it’s durability. These are built to last. We will warn you though, rabbit urine is very acidic. It will rot out even pressure treated lumber. We had one rabbit that would only “go to the bathroom” in its den area. It didn’t take long to totally rot out one corner of a hutch. We should of gotten rid of that rabbit asap. Our other rabbits “go” in the common area with the 1/2″ wire mesh so the urine isn’t an issue with them. It was just that one dang rabbit. Hope this helps. Any questions, don’t hesitate to ask.
LikeLike
Once you have the framework done, it will be very easy to figure out how much lumber you would need for siding, but it just depends on what you want to use.
LikeLike
I’m trying to estimate the total length of the lumber needed. Do you by chance have an estimation? I love this design, I’m looking forward to building it and making my rabbit cleaner.
LikeLiked by 1 person
I made one very similar to this design a few years ago. I had a few problems though as I’m sure you did too. My rabbits would not poop over the screens but in the nesting box area. That caused the wood to eventually rot and need replaced. My suggestion is to use a screen on the entire bottom and cut a board to be removed when not needed. (Summer time or non nesting period). I am in the process of building another hutch but plan on using a piece of metal angled to an old gutter. Then angle it to one side into a bucket. But overall a very good idea making cleaning rabbit hutches easier.
LikeLiked by 1 person
Great instructions, a fantastic solution for the collection of manure.
LikeLike
Hello, I’m curious as to how you keep your rabbits from pooping and peeing in the den areas where the floor is plywood? Thank you!
LikeLike
Amy, great question. The two rabbits we have right now do not poop or pee in their dens at all. That is why they have lasted as long as they have. lol. we had 1 rabbit that would only poop and pee in their den and it did some damage to the structure. After repairing it, we are careful to pay attention to any rabbit that relieves themselves in their den. They quickly make their way into the freezer and those that don’t live to breed another day. We are also currently planning a whole new “honeymoon suite” for breeding purposes.
LikeLiked by 2 people
We are new to the rabbit world. My question is when it is the cold session what do you do with the rabbits? We are in central Indiana it can be quit cold during the winter with windchill and all. Is there away to make a front cover, to help keep the cold out? Love this idea. Winter her can get below -10 without wind chill. Any help is appreciated.
LikeLike
Hey Jackie, we understand your issue with the weather. By creating the “side den” area, the rabbits have an area to stay warm and get out of the elements. It’s important to have a solid floor in the den so cold air isn’t blowing up in on them. We deal with extreme heat and cold which is why it’s just as important in hutch placement as it is in hutch design. Our hutches are on the east side of our work shop. In the summer, they only get sun until noon and then they are in the shade the rest of the hot day. In the winter, they get the warm morning sun. Storms and weather come in “usually” from the west, sw, or nw. By having the hutches on the east side of the building they are protected from the high winds and rough weather. We do not have a cover for the front and have never needed one. Our rabbits do well and seem to be very happy and content. Hope this helps. Any more questions, don’t hesitate to ask.
LikeLike
Hello, I love your hutch! I’m going to try to build my own and was wondering if you have a list of the materials you used. Thank you for posting this awesome project!
LikeLiked by 1 person
sadly, because most the rabbit hutch was made from reclaimed or leftover materials we never put together a materials list. Also, the 2×2’s were actually 2×4’s that we cut down. It really depends on how you want to make it. I suggest looking at the pictures of just the skeleton frame. That should give you an idea of how many 2×2’s you need. also, put the framework together with 2 1/2 ” screws, not nails just in case you need to do repairs down the road. we used 1″ thick deck boards for the siding, but you could use anything you want to achieve the look and feel you want for your homestead. I could be wrong, but I think I got away with 1 sheet (10 ‘ long) of tin roofing. and definitely use 1/2″ by 1/2″ square mesh for the flooring. Any bigger and you can hurt the rabbits feet and risk babies falling through the holes. I know this isn’t much help, but if you come up with anymore questions, don’t hesitate to ask.
LikeLiked by 1 person
We are excited to build this plan as our kids start to raise rabbits for the 4H stock show. We have 2 pens of 4 rabbits coming and aren’t sure if this plan will hold 8 young rabbits for a couple months until show time. I don’t plan to venture into breeding. And we don’t plan to keep them as pets.
LikeLike
I am going to try this. It is an awesome idea and very well thought out. Thanks for putting it online
LikeLike
Hi! I absolutely LOVE this design. My husband and I plan to build something very similar to it in the next month or two. But I have a question. Can you tell me about how big your rabbits are? We’ll be acquiring American Chinchilla Rabbits and want to make sure they have plenty of room. Thank you so much for your help!!
LikeLike
Hi Angie. They are adult New Zealand Whites. The meat weight can very between 9-12 lbs.
LikeLike
Greetings from West Virginia! I have shopped around for two weeks for an outdoor rabbit hutch. My hubby wants meat rabbits and I wanted to surprise him with a rabbit hutch. Everything I see online has good sides…like an attic roof that raises for easy cleaning….to the bad side…. like cheap wood…..Could you give me a complete supply list to get this for him? I can go to lowes and buy everything. My hubby started the bracing supports to build his own, life got in the way and he didn ot get to finish it, so for Christmas, I wanted to get it for him. Thank you so much!
LikeLike